cmiVFX: Creature Creators Handbook Volume 01
English | Team: N/A | .MP4 | 1.9 GB
Genre: Video Training
cmiVFX just released the beginning of an on going masterclass series for Creature Rigging and Animation featuring the legendary Simon Payne. This first masterclass is over 8 hours long and will entertain your creative spirit with the truth about rigging in a production environment. Learn not only the methods used in production pipelines, but also learn how to customize your own Creature pipeline with this detailed video documentation for both Autodesk Maya AND Softimage. No matter which app you decide to use, the information is covered! We show you how to use BOTH for a reason. When working with large collaborative projects, you will need to move between the two most common apps for Creature Control. Scripts and Samples are included in this lesson, as well as an outline to follow for easier step by step instructions. This information is not found anywhere else! Be one of the first to know what Simon REALLY says!
Chapter Descriptions
Introduction
Welcome to the cmi creature and character Rigging series. My name is Simon Payne. This is my first set of cmi tutorials, so bare with me and I shall try not to err or umm too much. I’ve spent the past 12 years working on feature films, as well as some high profile commercial campaigns. I have spent much of that time dedicated to characters, but also led in several other 3D disciplines, and thus I try to utilize some of those pockets of handy tricks and techniques whilst rigging.
For this series, we are going from beginner to advanced film-production level, covering the main concepts of rigging, through to advanced deformation and puppet rigs, modular rigging workflow, speed issues, and working within a development methodology inclusive of setting up python modules and scripting tutorials. We will focus mostly on Maya, but I will give some point of reference to aspects of Softimage equivalents where I feel it is relevant or helpful. Also, I’d like to kindly thank Dosche Design in advance for providing us with an excellent set of creature and character models to use for demonstration.
In this first of 3 cmiVFX videos, we’ll be covering the key concepts. Some of this may seem obvious to those with some experience with rigging, but there are theories and principles that will guide us through to the following 2 videos coming later, and so its worth watching this video all the way through even if you consider yourself to be an intermediate or advanced rigger. Our key areas for this session are listed below.
Rigging Overview And Theory - Why is this relevant?
First, you need to properly understand what the term “production quality” rigging pertains to. My rigging practice, is not something that is set in stone. It evolves and changes all the time. It is because it is less of a designated workflow, and more of a general philosophy.
By example, when I switched from the film department of one particular VFX facility, to their commercials department, I was predictably confronted with the assumption of its artists and supervisors, that they could not really utilize the powerful tools and workflows developed in the film department, on commercial projects.
The reason, predictably, was “we have a much faster turn around than film and no time for things that don’t work or need months of finesse etc.” My counter-argument, is that the turnaround required by film projects, is no different from commercials. There are just much more complicated shots and many more shots, requiring more people, over a greater show time. Individually speaking, each artists’ contribution has the same bid-time or less, than we would bid for the same asset build or shot production in a commercial project. Feature film technology is developed by facilities for this very reason.
If it takes 15 days to develop a character in commercials, it takes the same in film and has a higher quality expectancy. We are always under a lot of pressure by the clients to do far more for feature film VFX, in far less time, for less money, on every project, every year, year after year. We work harsh hours very often to stick to those deadlines that are no more forgiving on a per-asset basis than commercials. On top of that, the clients for film work, are usually more picky, and ask for a lot more changes, with no additional time or money to achieve those changes. There is only one way around it....develop tools, pipeline and workflow that support those tight turnarounds, and still give you the ability to raise the quality threshold. Make it efficient, and incredibly fast, far faster and more powerful and more reliable than the software offers out of the box, or with simpler pipelines. If on commercials, you only have software out-of-the-box, or a simpler pipeline, don’t be surprised that assets are tougher to create in the time frame or that which you create is a lower quality than you would have made with film department tools.
Don’t just assume that something that looks awesome is unachievable. Make it achievable, and then theres no problem with using it. Having time to develop is a different discussion. But once you have, you can use what you have developed, so there is no reason to be afraid of aiming higher. Thus, the path I will be guiding you down in this rigging series, follows the mentality that we aim for the highest quality, that which you would regard to be standards set in the heights of feature film VFX. Just because you are a hobbyist or a commercial boutique, does not mean that you cannot achieve that quality or do it fast enough, and just because the next levels of quality require more complexity and production time on the face of it, does not mean it requires more time or risk in reality, if you start as you mean to go on, and adhere to a sensible pipeline and workflow. Remember also, this takes little effort to set up, as I will show. Even a basic pipeline I’ll show you in this series, is usually far more than most cg boutiques actually have, or certainly hobbyists. So just a little time invested in setting up, will save you a lot of time during show production, and means that your ability to produce cg at home or whatever, is not limited to spending months developing a single character that you still regard as inferior to something made for Lord Of The Rings. You can raise your target and achieve much closer to that level, in far less time than you think, if your attitude is less of “it doesn’t look exactly like my reference, but that will do, no time left,” and more one of “so how do I make it do that, and can I make that re-usable at the push of a button to use on other shows and characters from now on.”
What do animators need? First and foremost, animators need speed. The more realtime they can scrub through and playback their animation, the faster they can get to results, meaning the quality within relative time frames, can constantly improve. The slower the playback, the more iterations of trial and error, animators have to go through to get to a result. Also the less dependency on generating Maya playblasts or Softimage viewport captures the better. Running realtime live in the viewport removes that step from necessity.
The closer a rig drives the behavior of a character or creature to that which animators expect, the less time they have to spend on achieving those movements and poses. Again, freeing them to spend more time on finessing and timing rather than working around rig limitations. The more intuitive a rig is, the happier and faster animators will be, as well as gifting them the opportunity to improve their own skills by producing better animation faster.
Point of note : my opinion is, and always has been, that no rigger is going to be sympathetic or understanding to animators or their needs, without trying their hand at animating their own rigs themselves. Also, in testing rigs by animating them, you also avoid issues and greatly reduce the number of requests for changes and fixes. What you may be used to before releasing or using rigs for animation, is running through some poses, or sometimes using a range-of-movement from an animation or motion capture. Invariably, rigs are accepted, approved and used....and then they come back, because once they are in shots, highly unexpected issues occur. The only way of predicting and avoiding those issues, is to put the rig in those poses. So I find that doing some simplistic, non-generic animation is far more telling than a range of movement or key-poses.
Speed and Efficiency
• What do animators need?
• What makes them efficient?
• Rig types and optimized character workflow
• Connecting rigs
• Animation and speed differences between rig types
• Topology and anatomy - Why does topology affect deformation and how does some basic understanding of anatomy help?
• Loops, directional loops and twists
Manipulation - An Introduction To Deformers And Weights
Maya’s primary tool for deforming character geometry is the “skinCluster.” I’m sure even beginners know about it but are perhaps unsure of what exactly it is. The skinCluster, is of Maya’s api type “deformer.” What that means in very simple terms, is that part of the toolset programmed into Maya’s code, is a particular description of a type of thing....a “class.” In this case, the class is called a “deformer”. Deformers come typically with one basic goal....to affect geometry, in a requested way. They take original information from the geometry, do a calculation, and spit out new vertex positions back onto the geometry. In Softimage this “operation” is also given by default to a pre-made “class”, called an “operator”. Softimage’s skinning operator is called an “envelope”. There are lots of different types of deformers. Maya’s skinCluster is designed to accept a multitude of “influence” objects, table out values per vertex for each of those influences, and apply what ever transformation, multiplied by those values, you apply to the influences themselves. I.e., if a vertex has 2 influences.....i.e. jointA and jointB, and a “weight” value of 0.5 for each, and you rotate jointB by 45 degrees lets say. Then the relevant effect will be that the vertex moves in the same way, but only half as much, and attempts to stay relevant to jointA by half also. So, when you select a joint, and a mesh and from the menu apply a smooth skin, What Maya is actually doing, is creating a deformer called a skinCluster, and connecting the geometry to its input/output. Maya’s component editor can display the weight values of your selected geometry’s skinCluster and its influences. We’ll come to setting these values and using Maya’s brush tool “Artisan” to make weighting skins simple, later in this chapter.
• Softimage's envelope operator
• Weights editors
• Skinning options, binds and poses
Maya comes complete with “rigid” and “smooth” “binds”. The “bind” is the methodology for affecting the mesh, and basically means you have two slightly differing skinCluster deformers in Maya. We are concentrating on characters and creatures, so for now we are going to focus on the “smooth” bind only. Rigid binds are essentially obsolete in the world of character deformation and I’ve done too much talking already, so lets just get straight into the “smooth” bind skinCluster.
• Binding options
• What is a bind-pose. Is it relevant to Maya and Softimage?
• Setting to bind pose
• Deleting bind pose
• The “neutral pose” :
• What is meant by “neutral”?
• AND SO MUCH MORE!
Skeletal Systems
• Skeletons – drawing and joint orientation
• Maya uses “joints”, Softimage uses “bones.” So whats the difference?
• Hierarchy edition
• Orientation - Joints need to know where the next joint is.
• Drawing joints in Maya and Softimage
• Scaling and translating in Maya
• Scaling and translating in Softimage
• Softimage bone hierarchy
• Maya joint hierarchy
• Softimage includes IK by default
• Labeling and naming practices
Inverse Kinematics (IK) / Forward Kinematics (FK)
• IK / FK Solvers
• What is IK? What is FK?
• Maya joints via Ik and Fk
• Softimage classifies all skeletal structures as “IK.”
• Softimage bones
• So if you want to just move/rotate joints manually (“FK”), how do you do it?
• Softimage FK manipulation (switching ik off)
• What happens if you continue with IK
• Whats the difference in Maya?
• IK / FK joints in Maya (switching ik off)
• What are Maya’s IK solvers?
• Single Chain Solver
• Rotate Plain Solver – pole vectors
• Softimage up-vector
• Spring solver
• Spline IK solvers
• Multi Chain solver
Triggers And Drivers
• Expressions
• Basic rig expressions : Maya : movement and time lag
• Softimage expressions
• Reason for limiting the number of expressions in a rig
• Scrub-ability
• Speed
• Renaming effect
• Namespace effect
• Removal
• Multi-rig effect
• Set Driven Keys / Events (SDK’s / SDE’s)
• Linked Relative Values
In Maya, there are some good alternatives to using expressions One of these options is called a “set-driven-event”, using “set-driven-keys.” SDK’s are an animation-curve recording of a dependent value. I.e. a value that is driven by another value. For example, translationX attr of one object, could be driven by translationY of another. Or the visibility of one object could be driven by the visibility of another object. One of the attribute data types Maya gives you, where Softimage does not is an “enum”. Each entry value could also drive the visibility, of a set of objects. Useful for things like geometry levels of detail in a rig.
• Linked value setups
• Custom parameter sets and data types
• Using the Hypergraph and Hypershade nodes for Rigging
• Another alternative to expressions is to use direct connections
• Softimage does not allow you the same direct relationship, it still requires a generated expression.
• Softimage Connection setup
Another fast and efficient alternative to expressions, is the use of “nodes.” As with a deformer, a node has an input, an operation and an output. A developer can write nodes to perform virtually any operation you require it to perform. Things like adding values, subtracting, multiplying, dividing, blending, inverting...as some very simple mathematical examples. Fortunately, you don’t need to be a developer and you don’t need to program your own nodes. Maya comes with a whole bunch. You have probably seen them and used them.....for shaders and textures. They are not just for shaders. They are nodes like any other in Maya, and you can connect any appropriate values to its input, thus you can get an output from them too. We can use them in rigging.
• Shader node setups
• Blending multiple joints between controls/joints
• Driving a wheel
Setting Up Controls
• Controls and Connection
• Making controls with curves : iconic representation, offset hierarchy nodes, constraints
• Show controlsEg.ma
• Combining Curves
• Custom attributes and direct connections, sdk’s, constraints, hierarchy, selection sets
• Visibility Switching
• Why Softimage hierarchy is not practical for rigging controls
• Show controls.scn Demo visibility and grouping
• Tagging and scripts for connecting together
• Show rigConnections.ma
Rigging A Humanoid
• Simple humanoids
• Skeletons
• Layout : drawing joints for characters in Maya
• Using scripts to add attrs to joints, limiting the manual recurrent processes
• Full skeleton layout
• Hands/Fingers
• Orienting joints for spine and limbs
• Using spQuickJointOrient
• Importance of anatomy
• Deer skeleton layout
• Skinning
• Initial bind using joint selection scripts
• Interactive bind
• Painting and editing skin weights
• Mirroring Weights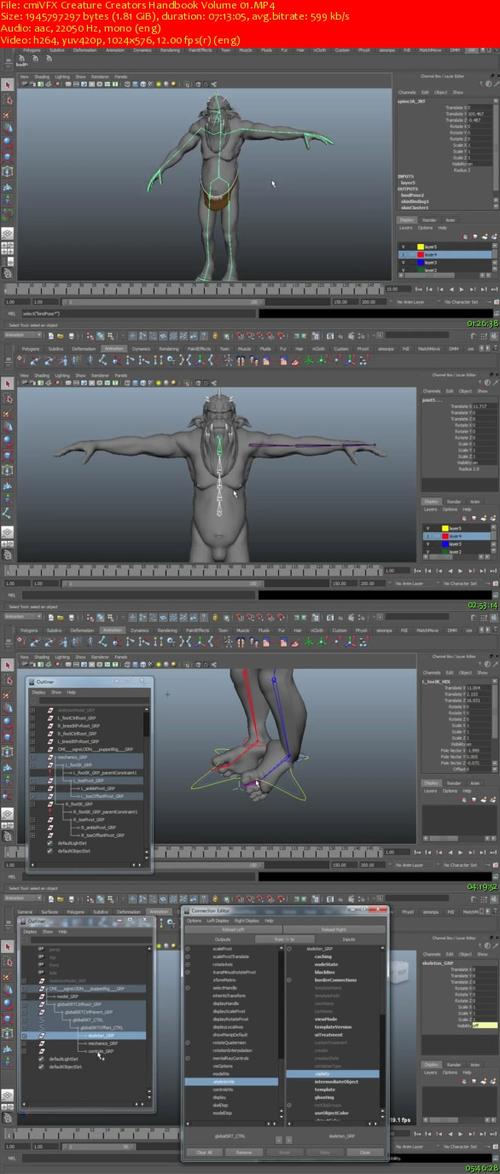
Letitbit Download Links:

TO MAC USERS: If RAR password doesn't work, use this archive program:
RAR Expander 0.8.5 Beta 4 and extract password protected files without error.
TO WIN USERS: If RAR password doesn't work, use this archive program:
Latest Winrar and extract password protected files without error.


